How To Make An Ombré Macaron Tower

Welcome to The White Whisk! Today I’m excited to share my experience creating my first macaron tower with you. We’ll go over how to split a batch and make ombré macarons, tower display options, and a few other tips and tricks I learned along the way!

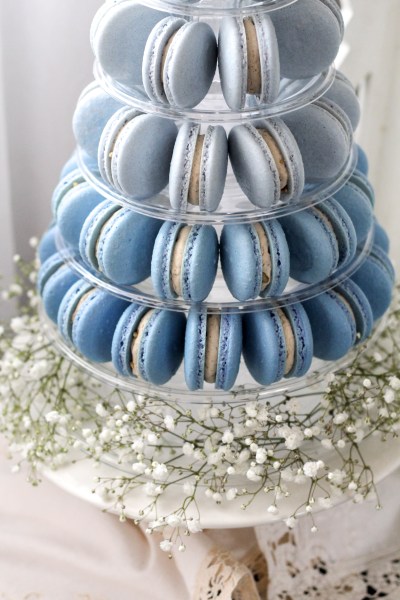
As someone who focuses primarily on creating blog/online content, it’s pretty rare I get the opportunity to create a larger macaron display. This French Blue Macaron tower was part of a dessert table I had the privilege of working on for my Brother and Sister In Law’s baby shower I helped host! Here’s a few shots of the shower.


For a closer look at all of the sugar cookie designs, head over to my French Blue Floral Buttercream Cookie Tutorial!

This post may contain affiliate links and I may earn a small commission when you click on the links at no additional cost to you.
Macaron Tower Displays
First up, let’s look at macaron tower options. Like I mentioned earlier, I don’t often have a need for a tower, so I wanted to find something in a lower price point that would still do the job. I landed on this clear plastic one from Amazon for under $20!

The tiers are detachable so you can customize how large you’d like it to be and how many rows you want. I will say, the very top tier was a bit hard to secure and get a good “click” into place. I ended up adding some super glue to just that top tier to make sure we didn’t have any structure issues!
If I had to compare the “stiffness” of the plastic, I’d say it lands somewhere in the middle of a super firm acrylic, and a plastic takeout container. I wish it was a bit more firm, but it totally did the job! If you’re looking for an affordable simple macaron tower display, I think it’s a great option.
If you’re looking to upgrade your macaron tower display, I’ll pass along a recommendation for 4evermemories products! Their towers are made of wood and I’ve heard nothing but good things about them from several fellow bakers. These towers also have the detachable tier option to customize the size. The price point is definitely higher since you have to purchase the whole tower, but if you know you’ll be using or renting it out often, it seems worth the investment!
Size and Consistency

With this particular tower from Amazon, I found I had to pipe my macarons a bit smaller than usual. I usually shoot for a finished macaron right around 2 inches, but for these I think they ended up closer to 1.75″. It was a bit squishy trying to get them in to the rows so I would recommend being diligent about checking the maximum size your display tower will allow!

Templates are always a huge help when it comes to consistency. Here’s the brand I’ve used for the last 3 years and have had great success with.

Ombré Split Batch Macarons
First things first, if you’re new to making macarons in general, or you just need to brush up on the macaron making process, head over to my Basic French Macarons Recipe for a run down on the basics!
To begin the ombré macarons, color your entire meringue to your lightest shade. Since your macarons will all be in the same color family, this will leave less guesswork when it comes to color mixing later.

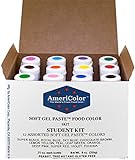
Keep track of the amount of drops you add! For this light french blue shade (in a batch of about 4 dozen macaron pairs slightly smaller than 2 inches), use 3 drops of Americolor Sky Blue, and 1.5 drops of Americolor Violet. Here’s a link to the student kit Americolor offers that can be used to create just about any shade your heart desires!

Once you get to the macaronage stage, make sure you ONLY FOLD UNTIL THERE ARE NO DRY INGREDIENT STREAKS REMAINING. Folding any further will increase your chances of having to over mix to incorporate your food coloring. Your batter will be THICK at this point.

Once your dry ingredients are just barely incorporated, divide your batter equally into 3 bowls.

Next, you can finish the macaronage of your lightest shade, and pipe it on the first tray.

Pipe the shells slightly smaller than your desired finished size so they have room to settle when you tap your trays to pop air bubbles!

For the next shade, add roughly 3/4 of a drop of Violet, and 1.5 drops of Sky Blue. Finish the macaronage and pipe on your second tray.
For the third shade, add 1.5 drops of Violet and 3 drops of Sky Blue. Finish the macaronage and pipe your third tray.
Be cautious while you finish folding your batter. Sometimes it can be easy to over fold when you’re working with a smaller amount!
The idea with ombre shades is obviously that you want them to get gradually darker. My favorite tip for ombre is from Barb at Sweet Mac Shop, who teaches that for each shade, you need to roughly double the color.

Since I added the initial color to an entire batch before splitting, the volume of the batter needs to be taken in to consideration when adding the color for the second shade which was only 1/3 of the batter. If you were to add all of your colors AFTER splitting, you would add your lightest shade formula to the first bowl, and then double that amount for the second bowl. For the third bowl, you would double the amount from the SECOND bowl. Hopefully that made sense!
Here’s a bit of a woops I had along the way and how I fixed it!
Rest and bake your shells as usual!
Assembly
I filled my macarons with a scrumptious brown sugar pecan swiss meringue buttercream! (Recipe coming someday!) You’ll want to make sure you have a filling that is sturdy enough at room temperature to hold your shells together so they won’t slide around when placed on their sides.

Something I found to be helpful was to thoroughly chill my macarons before the event so they were firm when it came time to assemble. I also wanted to keep them chilled until right before the baby shower started because one of my other fillings was cream cheese based.
Make sure to consider how long the macarons will need to be out at room temperature when deciding what filling to use!
I started with my lightest shade at the top tier and then worked my way down, but there’s no hard and fast rule that you have to do that. I left my bottom tier empty so I could fill it with fresh baby’s breath. So dreamy 😍

Ombré Macaron Tower Tips & Tricks Summary
- When choosing a macaron tower display, consider the amount of customization desired like detachable tiers, how often it will be used, sturdiness needed, and price point.
- Before baking, measure the maximum size your macarons can be and still fit in the tiers so they won’t be too large.
- Choose a filling that will be sturdy enough at room temperature so your macarons won’t slide around when placed on their side
- When splitting your batter, color meringue to lightest shade, and split into three bowls when the drys are JUST incorporated.
- For each ombre shade, you’ll need to double the amount of color. (Make sure to consider the fact that you’re dividing your batter into smaller amounts than what you originally added color to. Thank you Sweet Mac Shop for this tip that I now use on the regular!
- Keep food coloring drops separate on your batter just in case you need to adjust after seeing how your other colors mix. (Or just wait to add color to each bowl until it’s time to finish folding it!)
- Be cautious not to over mix your batter.
- Thoroughly chill finished macarons before assembling your tower so they will be firm and less likely to be squished or shift around.

How To Make An Ombré Macaron Tower
Equipment
- 1 Macaron Tower
Ingredients
- 195 grams Egg Whites Approximately 4 Large Eggs (Use a scale)
- 180 grams Granulated Sugar
- ¾ tsp Cream of Tartar
- 300 grams Almond Flour
- 300 grams Confectioner’s Sugar
- 7.5 drops Americolor Sky Blue
- 3.75 drops Americolor Violet
Instructions
Ombré Macarons
- Line 3 baking sheets with silicone mats (circle template optional but recommended).
- Place a medium sized round piping tip in a large piping bag. Twist the bag right behind the tip and add a clip to seal off the opening. Place the bag tip down into either a clean tall cup with the edges folded over the rim to keep the bag open, or clip it into a bag holder.
- Using a kitchen scale, carefully weigh out and sift the confectioner’s sugar and almond flour into a medium mixing bowl. Whisk well to fully blend the two together.
- Place egg whites, granulated sugar, and cream of tartar into a large mixing bowl, and begin beating with a whisk attachment using either a handheld mixer or a stand mixer for 2 minutes on a medium low speed (Kitchen Aid Speed 4).
- Turn up the mixer to a medium speed (Kitchen Aid Speed 6) and beat for an additional 2 minutes.
- Add 1½ drops of Americolor Violet Gel Food Coloring, and 3 drops of Americolor Sky Blue to the meringue.
- Turn mixer up to medium high speed (Kitchen Aid Speed 8) and beat for 3 more minutes, or until peaks are very stiff and the meringue clumps up in a ball in the center of the whisk. Test stiffness by removing whisk and pointing it upward. Once large peaks can firmly hold their shape flipped upright, your meringue is ready.
- Pour half of your almond flour/confectioner’s sugar mixture into the bowl with your meringue, and fold 15 times. One fold is equivalent to scraping all the way around the edge of your batter in your bowl, and then dragging your spatula through the middle. Be sure to scoop around the bottom of the bowl as well so you don’t miss any dry ingredients.
- Pour in the remaining powdered sugar and almond flour, and continue folding only until the streaks of dry ingredients have disappeared, and then STOP. Do not continue folding as you normally would with macaron batter.
- Divide batter equally among 3 bowls.
- Begin preheating your oven to 295 degrees, using an oven thermometer to ensure accurate temperature readings.
- With your first bowl, fold until the batter mostly settles back into itself when you wiggle your bowl back in forth. It is important not to over mix, so check your batter’s readiness every 5 folds or so at this point by scraping all batter down to the bottom of your bowl, and then wiggling your bowl back and forth several times. If the batter levels out with very few peaks and lines remaining, it should be ready.
- Pour the batter from the first bowl into the prepared piping bag, and twist the opening off. Hold your bag at the twist between your thumb and pointer finger. Remove the clip.
- Holding the piping bag straight up and down, apply pressure to begin piping your batter in the center of your circle templates, releasing pressure once you are a few millimeters short of your desired size. (For the macaron tower linked in the post, you'll need to pipe them just under 1.5 inches wide to make sure they won't be too large to fit in the tiers once they've settled after tapping your trays.) After you release pressure, use a small quick circular flick to release your tip from the piped macaron.
- Once you’ve piped all of the batter from your first bowl with the lightest shade, use a wooden spatula to scrape down any remaining batter in your piping bag towards the piping tip to "clean" the lighter shade out, and pipe macarons until the batter is gone.
- Once you've finished piping, firmly bang the tray on the counter a few times to pop any air bubbles and smooth out shells. Pop any remaining large bubbles with a toothpick.
- To your second bowl, add ¾ drop Americolor Violet, and 1½ drops of Americolor Sky Blue and fold until batter mostly settles back into itself when you wiggle your bowl back in forth like mentioned in step 12.
- Load your second bowl's batter into the same piping bag use for the first shade, and pipe your second tray repeating steps 13-16 with your medium blue shade.
- To your third bowl, 1½ drops of Americolor Violet, and 3 drops of Americolor Sky Blue and fold until batter mostly settles back into itself when you wiggle your bowl back in forth like mentioned in step 12.
- Load into the same piping bag and pipe your third tray repeating steps 13-16 with your third and final shade.
- Set aside shells to dry until they form a skin and are no longer tacky to the touch. Once you can gently run a finger over your shells, they are ready to bake. Use a fan to speed up the process, rotating the tray every five minutes or so to ensure even drying. This usually takes at least 20 minutes for me even with a fan. (It may take much less time depending on the humidity of where you live)
- Once shells are dry, and the oven has fully preheated to 295, place one tray in the center of the middle rack of the oven. Bake for 18 minutes.
- Quickly open door to check the shell’s doneness by gently pressing on the side just above the feet to see if it’s firm. If it moves at all, bake for another 2 minutes.
- Check shells again by performing the same test, pressing on the side. If they are still unstable, bake for one more minute, and check again. Repeat until shells are firm and do not budge.
- Repeat baking process for the second and third tray, baking one tray at a time.
- Allow shells to cool completely, and the carefully remove from silicone mat or parchment paper by gently peeling them off.
Assembly
- Match each shell with a partner shell of equal size.
- Pipe buttercream or sturdy filling of choice in to the center of one shell in each pair, leaving at least 1/4 inch of space around the edge.
- Gently sandwich the matching partner shell on top to complete your macaron.
- Refrigerate in an airtight container for 24 hours to allow the macarons to “mature” and fully develop their flavor and texture.
- Make sure macarons are chilled before assembling your tower so they will be firm and less fragile to handle.
- Before adding macarons on, make sure tower is firmly assembled and balanced. (I ended up having to super glue the top tier on to the second tier with the Amazon tower linked in the post)
- Beginning at the top of your tower, add your lightest macarons to the top two tiers.
- Add your second shade all the way around the next tier, followed by the darkest shade on the second from the bottom tier.
- Add fresh florals or greenery around the base of the tier. Admire your beautiful centerpiece!
Leave a Reply

| New |
Learn how to whip up gorgeous macarons from your own kitchen with step-by-step lessons that simplify the entire process.
Learn More
The White Whisk
Online Macaron Course
How to split a batch and make ombré macarons, tower display options, and a few other tips and tricks.
How To Make An Ombré Macaron Tower

To rest macarons or not to rest? Or…Option C, the oven drying method!
How to Oven Dry Macarons and Skip the Resting Process

Ready to begin making macarons? Here's all the supplies you'll need.
Macaron Supply List: Everything You Need to Make Your Own Macarons

A detailed list of the current gear I use to capture photos and videos.
Must-Have Food Photography Gear: Cameras, Lenses, Backdrops, and More

Subscribe now to snag your freebie and stay up to date on the latest recipes and baking fun. Discover simple yet powerful tips that will have you creating bakery-worthy treats in no time.
7 Tips to Instantly Elevate Your Baking
Join My Email List for a free bonus

I bought the plastic tower as well but my question is what did you do so the plastic tower didn’t move on top of the base? I’m planning to use a cake base and on top the plastic tower.