Waves and Sun Macaron Mosaic Tutorial

Creating this intricate macaron mosaic requires a pinch of insanity and a whole lot of patience, but the result is a stunning work of art to be proud of.
This post contains affiliate links. This means I may earn a small commission should you chose to make a purchase using my link at no extra cost to you.
To begin, you’ll need to create your design. I used a cereal bowl to trace a circle on a piece of paper for my guide, and then sketched out my design. The sky is the limit with your inspiration here. Look to nature, fashion, home decor, or anything that lights your fire to help you imagine your design!

I decided to outline my final design in sharpie so it would show through my silpat clearly. Keep in mind, the smaller the sections of your design are, the more time consuming it will be.
I filled in my sections with colored pencil to give myself a better idea of how many colors I would need to divide my batter in to. I ended up doing six which was a bit ambitious, but it ended up working out ok!
To split your batch to create multiple colors, you’ll need to prepare your meringue and sift your dry ingredients as usual, but then only fold in your drys until you’ve just incorporated them and you no longer have streaks of ingredients. If you’re looking for a run down on macaron making basics, head over to my Basic French Macaron Recipe.

At this point, you’ll separate your batter into however many bowls you’ll need for your color scheme. Like I mentioned earlier, I did six for this color palette.
Next you’ll need to add your color and bag your batter. I went for an ombre effect with my blues and my yellows. Two of my yellow shades ended up being a bit too close for my liking, so make sure you differentiate the amount of color between shades.
I love using this trick from Sweet Mac Shop for my ombres. You start with your lightest shade, and then for each of the following shades, you double the amount of food coloring. So for example, for my blues, I started with a smudge of brown, one drop of blue, and a smudge of yellow. For the next portion I did two smudges of brown, two drops of blue, and one smudge of yellow. For the third I doubled again and did 4 smudges of brown, 4 yellow, and 4 drops of blue.
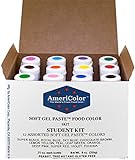
Repeat this same process with your yellows starting with 1 smidge of brown and 1 drop of yellow, then 2 smudges of brown and 2 drops of yellow, then 4 smidges of brown and 4 drops of yellow. Here’s the food coloring I use to mix up my shades! I was out of my Americolor brown so I ended up using Wilton Brown.
Obviously you can customize these colors to whichever color scheme you’re going for, but here’s a rough framework if you’re looking to recreate this waves and sunset mosaic.
As you add each color, you’ll need to finish the folding (macaronage) process for each shade. After every few folds, wiggle your bowl back and forth several times and see how the batter settles. You want it to still have a few soft lines/ridges to avoid over mixing as you pipe through small openings.

Once you’ve finished folding each shade, fill them into separate piping bags fitted with a coupler, and rubber band the wide opening off to prevent your batter from spilling out. Place plastic wrap over the coupler opening as well to prevent your batter from drying as you work. Before you pipe anything, start preheating your oven to 295 degrees.


Now comes the first tedious part. At this point, you’ll need to place your sketch on a baking sheet underneath a silicone mat. Once you’ve situated your first bag of batter with a small round piping tip (Wilton 3 or 4), you can begin filling in each section of your sketch with small dots. Make sure to leave enough room between the dots so they don’t smash together as they bake. Do not tap your tray after piping your dots. Pipe a substantial amount of extra dots outside of your sketch as extras to fill any gaps. See photo for reference!

Once you’ve filled in each section with the matching color of piped dots, you’ll need to rest your tray until your dots have formed a dry skin on the outer layer. I usually have a fan gently blowing air on my trays to speed up the process and rotate my tray every five minutes to ensure even drying. Once your oven is preheated and your dots have a formed a dry skin, bake for 11-13 minutes, or until your dots no longer wiggle when you gently tap the side of them. Bake for one extra minute at a time and check if you need to add more bake time.

While your dots are baking, you’ll need to pipe your other two macaron circle layers that will become the base of your cake. Trace another circle using the same bowl to create a plain template, and place it on another baking sheet with a silicone mat. Remove your small piping tip on whatever color you’d like to show on the outside of your layer. From here you can either awkwardly hold a large round tip over your bag as you pipe, or you can place your bag into a larger piping bag fitted with a large round tip.
Start piping the rim of the circle about 1/4 inch in from your templates line. Continue working your way in, switching to your other colors if needed until you’ve piped the full circle. Bang your trays on the counter to remove any air bubbles and pop any large bubbles remaining. Set your first circle layer aside to rest and repeat with your second circle layer.
Rest each layer until the dry skin has formed and then bake at the same temperature for 20-24 minutes or until your shell no longer wiggles when gently pressed on the side. Wait until circles have cooled completely before attempting to cautiously remove them from the mat. I found it worked well to place my hand on the circle and then flip the tray over, and THEN peel the mat from the top while I held the layer with my hand.
For assembly, I ended up using a large round tip to pipe some Swiss meringue buttercream dollops on my bottom layer. I then placed my top layer on that, and then spread more Swiss meringue buttercream on top of that using an offset spatula. I wasn’t super happy with the cleanliness of my edges, so if I had to do it again I’d recommend just piping the top layer of buttercream on with a round tip, and then carefully smoothing it out from there!

Next comes the most tedious part, the placement of your macaron dots! I used a toothpick to lightly sketch where my sections were to give me a reference point. Then, carefully remove one section of your piped dots at a time, and place them in your section. A pair of tweezers can help with precision if you’re having trouble just using your fingers. Once you’ve repeated this process with each section, go back in with more white Swiss buttercream and pipe the dividing line between your sections! See video for full demonstration of mosaic placement.
Whew. This project is a serious labor of love, but if you’re like me and love a good challenge, it will be incredibly rewarding! If you want to make this a quicker process you could certainly pipe larger pieces or have less sections and it would still be beautiful. Tag me on Instagram @the.white.whisk if you give it a try!


Waves and Sun Macaron Mosaic Tutorial
Ingredients
- 130 grams egg whites
- 120 grams granulated sugar
- 200 grams almond flour
- 200 grams confectioner's sugar
- ½ tsp cream of tartar
- 1 tsp Wilton Brown Gel Food Coloring (divided)
- 7 drops Americolor Sky Blue Gel Food Coloring (divided)
- 11 drops Americolor Lemon Yellow Gel Food Coloring (divided)
- 2½ cups buttercream or sturdy filling of your choice
Instructions
- Sketch out your template. I used a bowl that was 7 ¼ inches across as the basic shape for my macaron mosaic. To replicate what I made, print out the photo in the post and resize so the circle will be 7¼ inches across when printed.
- Place template on a baking sheet underneath a silicone mat.
- Prep 6 medium piping bags with couplers. Pinch off the piping tip ends with a clip, and place piping bags in a bag holder or cup with the large end of the bag held open so it’s ready to load your batter into.
- Place egg whites, granulated sugar, and cream of tartar into your mixing bowl, and begin beating with a whisk attachment using either a handheld mixer or a stand mixer for 2 minutes on a medium low speed (Kitchen Aid Speed 4).
- Turn up the mixer to a medium speed (Kitchen Aid Speed 6) and beat for an additional 2 minutes.
- While meringue is mixing, sift almond flour and powdered sugar into a medium size mixing bowl, and whisk well to incorporate.
- Turn mixer up to medium high speed (Kitchen Aid Speed 8) and beat for 3 more minutes, or until peaks are very stiff and the meringue clumps up in a ball in the center of the whisk. Test stiffness by removing whisk and pointing it upward. Once the peaks can hold their shape flipped upright, your meringue is ready.
- Add half of your dry ingredients into your meringue and fold 15 times, scraping around the edge of the bowl and dragging your spatula through the center each fold.
- Add remaining dry ingredients and fold JUST until your batter has no dry ingredients remaining. Do NOT continue folding yet as you would with regular macarons. Your batter should be stiff, but not have any dry ingredient streaks.
- Divide batter into 6 bowls.
- To your first bowl, add 1 small smudge of Wilton Brown, and 1 drop of Lemon Yellow and fold until batter mostly settles back into itself when you wiggle your bowl back in forth. Batter should still have soft lines and ridges but not be super stiff. Load into a piping bag with a coupler and use a rubberband to tie off the opening.
- To your second bowl, add 2 small smudges of Wilton Brown, and 2 drops of Lemon Yellow and fold until batter mostly settles back into itself when you wiggle your bowl back in forth like mentioned in step 11. Load into a piping bag with a coupler and use a rubberband to tie off the opening.
- To your third bowl, add 4 small smudges of Wilton Brown, and 4 drops of Lemon Yellow and fold until batter mostly settles back into itself when you wiggle your bowl back in forth like mentioned in step 11. Load into a piping bag with a coupler and use a rubberband to tie off the opening.
- To your fourth bowl, add 1 small smudge of Wilton Brown, 1 drop of Americolor Sky Blue, and 1/2 drop of Americolor Lemon Yellow and fold until batter mostly settles back into itself when you wiggle your bowl back in forth like mentioned in step 11. Load into a piping bag with a coupler and use a rubberband to tie off the opening.
- To your fifth bowl, add 2 small smudges of Wilton Brown, 2 drop of Americolor Sky Blue, and 1 drop of Americolor Lemon Yellow and fold until batter mostly settles back into itself when you wiggle your bowl back in forth like mentioned in step 11. Load into a piping bag with a coupler and use a rubberband to tie off the opening.
- To your sixth bowl, add 4 small smudges of Wilton Brown, 4 drop of Americolor Sky Blue, and 2 drops of Americolor Lemon Yellow and fold until batter mostly settles back into itself when you wiggle your bowl back in forth like mentioned in step 11. Load into a piping bag with a coupler and use a rubberband to tie off the opening.
- Begin preheating oven to 295 degrees.
- On your baking sheet with the template under the silicone mat, pipe dots in each section of your mosaic with the appropriate color using a small round piping tip (size 3 or 4 recommended) making sure to leave enough space between each dot that the batter will not merge together when baking. Pipe quite a few extra dots to use as fillers as shown in photo in post.
- Set tray aside to rest until dots have formed a dry skin and are no longer tacky to the touch. To speed up the process, place a gentle fan near your trays and rotate them every 5 minutes or so to ensure even air flow to each side.
- While dots are resting, pipe your larger circle layers by switching to a larger piping tip. You can either awkwardly hold a much larger tip over your open coupler while you pipe, or you can place your filled bag with the open coupler into a larger bag fitted with a large round piping tip.
- Pipe your circles beginning on the rim of the circle about 1/4 inch in from your template line. Continue working your way in, switching to your other colors if needed until you’ve piped the full circle. Bang your trays on the counter to remove any air bubbles and pop any large bubbles remaining. Set your first circle layer aside to rest and repeat with your second circle layer.
- Once the oven is preheated and your dots have a formed a dry skin, bake for 11-13 minutes, or until your dots no longer wiggle when you gently tap the side of them. Bake for one extra minute at a time and check if you need to add more bake time. Repeat until fully baked.
- Repeat baking process with larger circles using a bake time of roughly 20-24 minutes.
- Wait until circles have cooled completely before attempting to cautiously remove them from the mat. I found it worked well to hold my hand on the macaron circle and then flip the tray over, and THEN peel the mat from the top while I held the macaron layer with my hand.
- Using a large round tip, pipe your choice of buttercream or filling in dollops on the top side of the first macaron circle layer. Place second macaron circle on top of the dollops, and then spread more buttercream or filling on top of that using an offset spatula.
- Used a toothpick, lightly sketch where your sections are to create a reference point for dot placement. Then, carefully remove one section of your piped dots at a time, and place them in the appropriate section. Once you’ve repeated this process with each section, go back in with more buttercream or filling and pipe the dividing line between your sections
- Mature in an airtight container in the fridge for 24 hours to achieve optimum texture and flavor. Enjoy within 3-5 days.

| New |
Learn how to whip up gorgeous macarons from your own kitchen with step-by-step lessons that simplify the entire process.
Learn More
The White Whisk
Online Macaron Course
How to split a batch and make ombré macarons, tower display options, and a few other tips and tricks.
How To Make An Ombré Macaron Tower

To rest macarons or not to rest? Or…Option C, the oven drying method!
How to Oven Dry Macarons and Skip the Resting Process

Ready to begin making macarons? Here's all the supplies you'll need.
Macaron Supply List: Everything You Need to Make Your Own Macarons

A detailed list of the current gear I use to capture photos and videos.
Must-Have Food Photography Gear: Cameras, Lenses, Backdrops, and More

Subscribe now to snag your freebie and stay up to date on the latest recipes and baking fun. Discover simple yet powerful tips that will have you creating bakery-worthy treats in no time.
7 Tips to Instantly Elevate Your Baking
Join My Email List for a free bonus
